So in 2009, my sister and I renovated my father's house.
I am going to clear up one misconception.
Renovating a house is not fun or as much fun as you might hope it would be. Don't fall for the Lowe's or Home Depot commercials with the happy couple, happily demolishing their home. It doesn't go that way. I grew up around major construction sites thanks to my family's engineering firm so I knew about delays, hidden costs, etc. and this still threw plenty of punches.
Ok I'm not going to explain every single picture because that would be excruciatingly detailed even for me, but I'll give you a quick run down.
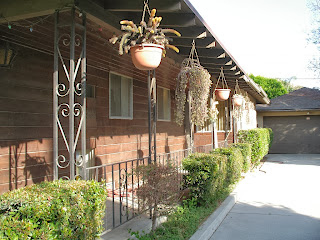
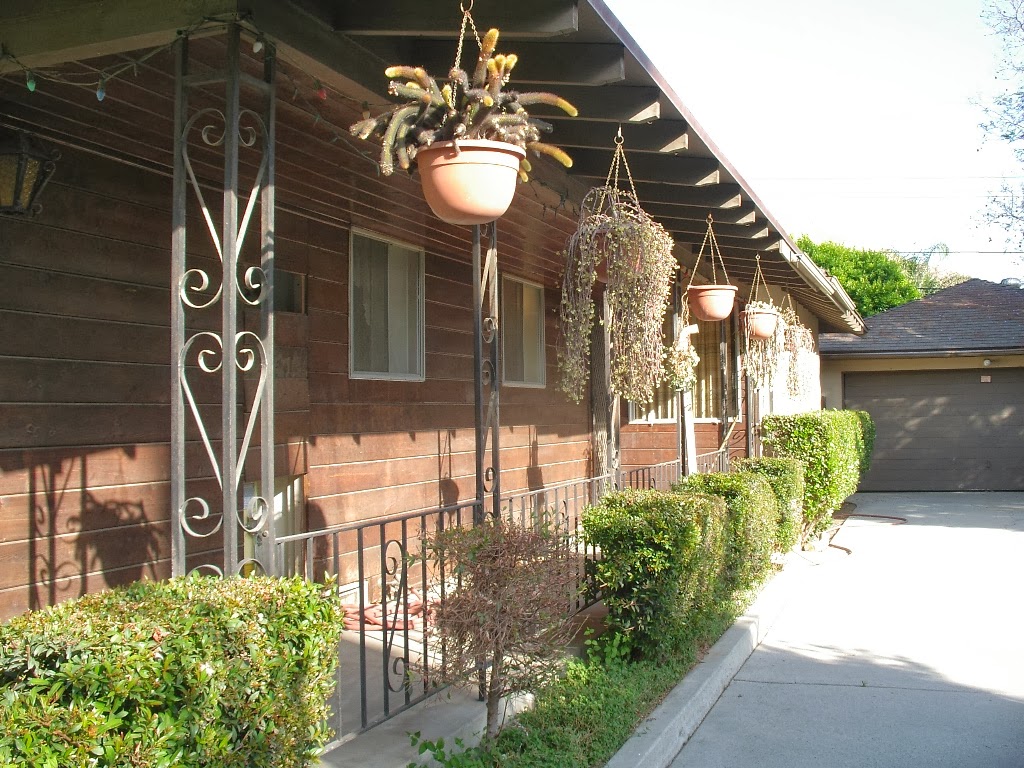
This house, as you can tell by the light fixture, was built in the early 1950's by my grandparents.
They lived there until their passing and then it was handed over to my father until his untimely passing.
As you can see from some of the pictures, not much had changed in the house since it was first built. All the windows were single paned and leaked like a sieve. Despite the A/C going 24/7 - Southern California summer is a lousy time to renovate - it never dropped below 90 in the house.
We used to have massive get family dinners here so the cabinets were full of dishes.
My father loved two things in life aside from his family. Books and climbing. The picture with the through and through fireplace shows a sliver of what was in the front room. What you can't see are the massive bookshelves holding hundreds of books.
The outside of the house was mostly taken care of - lawn mowed and water, fruit trees in the back all healthy - but there was a lot of overgrowth that needed to go.
And the garage door wouldn't shut unless you slammed it.
Inside we had to replace just about everything you see from flooring to appliances, lighting, fans, etc. We also replaced the interior doors, something that sounded easy and ended up being a royal pain. What passed as "standard" in the 1950's is far from standard now so many items that sounded simple to replace, such as the doors, were in fact more difficult than needed.
Things to do:
* Clear down the house
* Deep clean house
* Replace all windows
* Bring electrical up to code
* New flooring
* Replace all fixtures
* New appliances
* Fix garage
* Re-plump house
* Clear down back yard
* Fix roof
* New gutters
* Paint house - interior and exterior
* New interior doors
* Mend fence
* Replace misc. items
* Repair interior walls
* Patch house against pests
* New roof insulation
A pretty standard list but each item had sub items. For example, new flooring meant removing the old flooring, replacing the padding, finding tile, laminate, and carpet, and installing. Replace misc. items means that every knob, pull, drawer handle, everything was replaced.
As you can see, this project is a lot bigger than it looks. This doesn't cover all the other tasks that had to be handled while the house was being worked out. That meant meetings with the lawyers, dealing with the estate, the other property, etc.
This was a large project.
Monday, November 4, 2013
Sunday, November 3, 2013
Renovation: Before (part 1)
I realize that I have neglected this blog, and so I plan to try and remedy that situation with this post.
This will be a large post that I have broken up into several posts. This post will be nothing but pictures. The next post will explain each of the pictures and give background.


This will be a large post that I have broken up into several posts. This post will be nothing but pictures. The next post will explain each of the pictures and give background.


Sunday, June 2, 2013
What's this?
A new post? Will this madness never end?
This weekend, we decided that it was time to sell my old truck, the Chevy S-10 that got me through the latter part of college, a move to San Francisco, plus many trips to Portland from San Francisco, a move to Seattle, with many trips to Portland, and a couple of years after before I purchased my current vehicle. She's been well loved, well taken care of, but still shows wear and tear.
We fixed the doors last weekend - a tedious project, and moved onto the interior.
Here's the interior of the truck, the seats, carpet, and some wiring removed.
The old interior. As you can see, it's had better days.
The new interior installed, trimmed up, and ready to go.
Almost done. A quick cleaning with the vacuum and it's finished.
And the leftovers plus the old interior.
This project, while considerably more time consuming than the doors project, was actually much easier. The doors still aren't completely done due to some disagreement between me, and the instructions provided - the internet didn't provide much help either.
So the S-10 project marches on. I suppose you're wondering if this is a project I will actually finish - the bed frame still isn't stained, and I've had to start over on the trophy blades -but since I've been getting calls on the truck, it's something that will have to be done. The remaining projects are numerous, but small - replace a couple of handles, fix the remaining door, deep clean, check the fuel system - and she should be in ship shape come late July.
Sunday, February 10, 2013
My new rule

Anyhow, my rule, newish rule is, "Try to never buy what you can make." That covers many different avenues, one of which happens to be coaching tools.
And why not? Coaching tools are expensive. Very expensive. And I believe that you get what you pay for - mostly. So if you spend a little, you're going to get a little. Pitch meters alone can cost upwards of $40 dollars. A pitch meter? The rigging tools I desperately want? Almost $200. Each. Ow.
Last time we chatted, I was in the process of building a height stick similar to the one found on a certain website. That project? Highly successful. Cheaper? Well, once you figure in the cost, plus shipping, yes, but not by a wide margin. Satisfying? Absolutely. So while you could order one, I prefer to build my own. And the bonus of it is, there's a rigging issue that seems to spring up every time I've used an "original" one of these that has been eliminated by me building my own. No more guess work which means while the cost difference was about $10 dollars - that helps these days - the headache issue has been completely negated. Win win.
The latest thing that we've built: A sit and reach box. With some help, I've built one that we'll be using later on this season. Again, ordering, not an issue, but why order when you can built it? Check out the link, and you'll understand why. And while the one you can build isn't as fancy as the ones you can buy - though I can make one that will have the sliding scale on it - at $17 dollars for the pieces needed, I can build 9 of them for the price of the cheapest version.
Granted, building or making all of your coaching tools isn't feasible, so you'll need to do some research. I won't make my own measuring tape because that's just silly though I may alter one that I buy. I won't build my own tool box because I'll never build one light enough and strong enough - mostly light enough - to rival what I can buy - and who has the machinery necessary to do all the bending and cutting right?
But I will say that if you sit down, take the time to do some research, you will find that you can produce what you need at home - still talking tools of the trade here though you can see what I'm getting at - for a fraction of the cost to buy it.
Thursday, May 17, 2012
Trophy blades
As you can tell, it's been a long while since I've posted here. And if you recall I've got several projects backed up on me from last summer. However, being the person I am, I jumped into a new project before finishing the other ones. You know what they say about shiny new toys.
Anyhow, if you check back on the other blog you'll see that we decided to award trophy blades to our graduating seniors. I believe the requirement is 4 years on the team but I might be getting that confused with something else. These blades came from Concept2 who sells extra blades for such a purpose and at $40 dollars a blade, it's really a great deal. You can even request sides.
I decided to follow a tradition I'd heard of and start getting a blade for each location I've coached at. So far, we're looking at 5 different blades but to make sure that this was something feasible, I went with only two to start.
 These are the blades as they come in. The base white is so much easier to paint that the older versions that came in primer gray. Still these need some touching up. I decided that despite feeling confident in my abilities, I'd start with two simple blade designs and move on from there. I chose Pacific Rowing Club and the University of Puget Sound because they shared a base color - important for the thrifty shopper - and again, have a very simple design that allows for multiple takes without tremendous frustration.
 If you've never done anything like this, don't worry. Concept2 has instructions on how to get solid results. Otherwise, it's pretty straight forward. These blades are in good shape but they are not pristine and require a little elbow grease. No worries though. For $40 dollars you really can't complain.
Start with very fine sand paper. You're looking to rough up the surface a little and take off some imperfections that might show through, not sand it down to nothing. Clean well. Concept2 recommends rubbing alcohol. I went with a mineral based cleaner applied directly to a rag.
 Like I said, very straight forward. Be careful when going around the edges though. The black from the blades can get onto the white parts.
 I recommend putting down a base coat regardless of what you're going to do with the blades. I went with a white base because both blades I'm painting as well as two that I plan on making next year will need it but you can go with many colors.
I also went with a quick drying paint. Proper spray painting requires several thin coats. This eliminates runs and drips and a quicker drying time can really help with the down time. These Krylon cans are awesome with swiveling heads to help with angles - unnecessary here but a nice feature - and put down very even coats. I also went with a base paint that had primer in it. I think primer is necessary but I don't believe you need to buy separate primer.
One thing that I strongly suggest is taking your time to do this. Yes you could in theory bang out the blades inside of a day. However for better results I put down two base coats over a 48 hour period. I put down 4 coats on the face of the blade on day then waited for it to dry before applying the paint to the back. So far I've been really pleased with the results with cleaner lines as well as a more solid hold - no touch up required so far - but do as you please.
 After two days the blades are ready for the next coats of paint. I went with only two blades this year to make sure that they got done but also to make sure that I got the process down correctly. Even at only $40 a blade it can add up quickly. These are also the most simple designs so I could afford to mess around here without causing myself a major headache.
 As I said, I went with blades from Pacific Rowing Club and the University of Puget Sound. Again because of the simplistic design - two personal favorites of mine - painting would be relatively painless. This painting takes a bit longer. The red paint that I chose coats very well but required several passes. The paint for the UPS oar required the same. They are currently waiting their final few passes before getting a clear coat gloss for protection.
Some tips:
1. Don't fret over matching colors too much. I went with a basic red for Pacific and a burgundy for UPS and both look strikingly similar.
2. Take your time. There's no reason to rush this. And don't be afraid to start over. This is not a one and done deal.
3. Tape, tape, tape. Blue painters tape is awesome. So are scrapes of newspaper. Be careful though. The day I started, the wind decided to pick up so paper was blowing around that was protecting the rest of the blade. Tape well but don't tape excessively.
4. I think the base coat is an absolute must. And the two in one primer and paint is a real time saving feature.
I'll post the finished results in a couple of days.
Sunday, October 9, 2011
Neglect
I've completely neglected this part of the blog during the summer and now that the weather has turned, it like most of the projects I was hoping to get done, remains unfinished.
Height Stick - In all honesty this is pretty much done. I need to simply finish putting it together. Alas the final assembly has been what I've been putting off for absolutely no good reason. But there it is. On the work bench, ready to go and simply sitting. Hopefully I won't forget about it until I desperately need it.
Bed Frame - This is the real guilty party here. This should have been done but I've been extra lazy this summer. And of course, it's the one project that I've had on my list that absolutely needed to get finished. What I'll probably do for now is assemble it, add the frame and leave it as it, 1/2 finished so I have a place to put the mattress and then next summer, try again. It looks good, just completely unfinished.
New Computer - This I'm proud to say is almost done. And with pictures. I have two laptops - one personal and one for mobile coaching though it needs an upgrade - but my desktop has been languishing on the side line. No more. The last two weeks I've been buying new components - last updated during the summer of 2004 - and with a lot of help, putting it together. We hit a few rough patches, mostly buying the wrong motherboard to go with the chip that I'd bought but last night it came together and started right up. I'm really pleased with it thus far and will be putting the finishing touches on it shortly; a secondary monitor, external backup hard drive, etc.
Why the second computer when I have two laptops? I wanted to do something with the desktop and decided that the reason I wasn't using it as much as I could have been and had done in the past was because of it's age and the fact that it wasn't what I needed. I thought about simply using the two laptops but I really did want one for complete personal usage and the other for coaching only. I have this paranoid thought that every time I fire off an e-mail with an attachment that I'll attach the wrong file and send some personal thought or a page from my novice novel writing years instead of a split time spread sheet.
When I decided to upgrade the desktop I realized that I had somehow managed to acquire two excellent - albeit not similar - monitors and having watched several of my friends who game use their set up, I wanted one of my own. However, despite loading the tower with components that would make any one of my gamer friends drool with envy, my computer is not going to game. With the two monitors I've come up with a set up that will allow me to run video on one FULL screen while taking notes on another rather than trying to make them fit into one smaller screen, or trying to run it off of two laptops - sounds easy, it's not. This will also allow me to have multiple full page documents open at the same time. I'm a pretty OCD person when it comes to documents and such and I have a hard time adjusting to a split view on a single screen so this will also help me deal with my own personal OCD issues. What can I say?
Sadly while getting the computer up and running was the easiest of the projects it was definitely low on the totem pole. Isn't that how it always is? That being said, I should knock out the new height stick in a couple of days and then hopefully get the bed done either next summer when the weather is more consistent or when I move to a place that has an attached garage.
Monday, June 13, 2011
Height stick
If you've ever spent any time rigging a boat then you know what I speak of. If you've not, then here's a link.
I need one of these. The problem is that rowing specific tools such as this are rather expensive. I have a hard time plunking down $65 plus shipping for what basically amounts to two pieces of square metal tubing and a couple of screws.
Another issue that I have with this is that having used one, it does it's job well but it doesn't necessarily make your job easier. It's probably me and my lack of rigging experience but I don't like having to eyeball oar lock height. The top piece when it's pushed down to oarlock height, doesn't extend far enough into the boat to measure the way that I want to measure.
So having thoroughly examined the one that we have at the boat house I've decided to create my own using the same sort of design - I saw the one that was created by Willie Black but he's smarter than I am and I don't know how to use his - only modified to help me.
I'm still gathering the pieces that I want for this but rest assured that once I get started I'll let you know how it turns out.
Stay tuned.
Subscribe to:
Posts (Atom)