This project is not as easy as it would appear, though I will admit that when it comes to anything sewing related, I'm not even a novice.
Problem 1: Weaving the elastic. It's a pain. A serious pain. Even when you've pinned down the edges and had them sewn it's not easy.
Problem 2: Sewing the elastic. It goes all over and even the person who helped me get the edges down had some trouble. I solved this by using double stick tape cut in half. I put down the tape, then applied the pieces so they stayed in relative order. There's still a couple trouble spots, but I'm not nit picking.
Problem 3: Stretching the elastic tight. I resolved to use a clip board to do this. What's the problem? Well the backing that you're attaching the elastic to isn't exactly firm so when you pull it has a tendency to want to come with the pull. I solved this by using a clip board and clipping down the edge I'm pulling against, then pinning the opposite edge, then sewing it up - by hand because the board gets in the way of the machine. The results were pretty good.
Problem 4: This was my problem, but one that you should avoid. Use black as your backing. I went with gray and the foam I used is showing stress mark where the foam got mangled or scratched. Issue? Only cosmetically. If you care about that, use black.
This project I figured you could knock out in two days, a day if you're really good with the machine and you don't have interruptions. I tend to take longer on projects because I break them up, or walk away when I run into an issue rather than sit there and get frustrated. So I'm still working, but I can see this coming together.
Will I do this project again? Hard to say. I think it's going to look nice, and I can tell you that the money spent is less than it would cost me to get a similar professionally made item. I might do it again, but I think that there needs to be some modifications done. The weaving isn't as fun as it sounds, and being the first, there's a lot of trial and error. We'll see.
Sunday, February 23, 2014
Tuesday, February 18, 2014
The next project follow up
I've been dealt a temporary setback. First off, I don't know how to use a sewing machine. Secondly, the sewing machine I was going to use under careful supervision gave up the ghost as I was in the process of doing a test run. Currently I'm waiting to hear back from a friend about the availability of her mother's machine and possible help.
But aside from that, let me catch you up. If you haven't taken a look at the project page, here's the link again. Rather clever if you ask me.
Securing the needed materials - until this sewing machine issue - was the biggest problem. I went through four different thrift stores looking for a book that suited my needs. I decided to stick with the older books for two reasons. The first is that I like the covers better than what we have on the newer hardbound books. Secondly, I surmised that older books would be well used books and the spines would be separated from the binding. This proved correct.
If successful, I plan on making a second one of these so when I found some rather academic looking books that suited my needs, I grabbed all of them. For the price of $11 dollars and some odd looks from the cashier, I am now set to do at least two. I'm rather attached to the old engineering guide that I picked up.
Forget fabric stores. I went, I looked, I went to Michaels and that's where I recommend you go for your materials.
I opted for heavy paper - think 4x the thickness of poster board and much stiffer. For a second version, I think I'll spend the money - $13 rather than $7 - and get heavy matting. The book I chose is still in good condition, but I think I'd like the extra sturdy feel of picture matting.
You will need the 9 yards of elastic. I went with the 0.5 inch strands and have used all but some scrapes. I also went with the neoprene backing because that was readily available. I chose grey because I liked the look better than black on black. They had some extra fun colors - orange and red - which I might use for the second book. You can see the neoprene behind the elastic when done so that might be fun.

As you can see here, I've marked out the areas with what I'm going to put where. The original has a large pocket on the right. I'm debating doing this, or weaving in some elastic for pens or other things. I'm going to put the iPod at the top - she put her cell phone there - and then straight elastic on the left.
The book I chose was slightly smaller than the one she used so I don't think I'll be able to get my laptop charger inside. I don't think I'd want to in any case because of how much space that would take up. Instead I'm opting to corral the cords I have in my bag - iPod charger, phone charger plus extention, HDMI cable - and a flash drive and ear buds.

This is where I am right now. I've cut the lengths I need and then attached the long pieces with pins. And then the sewing machine mishap happened, so now we're in a holding pattern. But things are coming along nicely, and it's a project you can probably knock out in a day, maybe two.
I don't have any recommendations as of now. I would say that you should error on the side of a book at least as large as the original if not slightly larger. Also take into consideration the thickness of the book, and what you plan on putting inside. One reason I chose to skip using the engineering book aside from liking it - a very clean book considering it was published in 1939 - is that it's only about 1.5" thick which can be limiting on what I can put inside if I plan on using both sides - and I do. I would caution about using too thick of a book. I saw an old dictionary that looked useful but the thickness - at least 3.5" - was a turn off. Remember this should fit in a bag.
Well that's it for now. Everything is set up and ready to go, so as soon as I hear back about a machine, we'll be off and running again.
But aside from that, let me catch you up. If you haven't taken a look at the project page, here's the link again. Rather clever if you ask me.
Securing the needed materials - until this sewing machine issue - was the biggest problem. I went through four different thrift stores looking for a book that suited my needs. I decided to stick with the older books for two reasons. The first is that I like the covers better than what we have on the newer hardbound books. Secondly, I surmised that older books would be well used books and the spines would be separated from the binding. This proved correct.
If successful, I plan on making a second one of these so when I found some rather academic looking books that suited my needs, I grabbed all of them. For the price of $11 dollars and some odd looks from the cashier, I am now set to do at least two. I'm rather attached to the old engineering guide that I picked up.
Forget fabric stores. I went, I looked, I went to Michaels and that's where I recommend you go for your materials.
I opted for heavy paper - think 4x the thickness of poster board and much stiffer. For a second version, I think I'll spend the money - $13 rather than $7 - and get heavy matting. The book I chose is still in good condition, but I think I'd like the extra sturdy feel of picture matting.
You will need the 9 yards of elastic. I went with the 0.5 inch strands and have used all but some scrapes. I also went with the neoprene backing because that was readily available. I chose grey because I liked the look better than black on black. They had some extra fun colors - orange and red - which I might use for the second book. You can see the neoprene behind the elastic when done so that might be fun.
As you can see here, I've marked out the areas with what I'm going to put where. The original has a large pocket on the right. I'm debating doing this, or weaving in some elastic for pens or other things. I'm going to put the iPod at the top - she put her cell phone there - and then straight elastic on the left.
The book I chose was slightly smaller than the one she used so I don't think I'll be able to get my laptop charger inside. I don't think I'd want to in any case because of how much space that would take up. Instead I'm opting to corral the cords I have in my bag - iPod charger, phone charger plus extention, HDMI cable - and a flash drive and ear buds.
This is where I am right now. I've cut the lengths I need and then attached the long pieces with pins. And then the sewing machine mishap happened, so now we're in a holding pattern. But things are coming along nicely, and it's a project you can probably knock out in a day, maybe two.
I don't have any recommendations as of now. I would say that you should error on the side of a book at least as large as the original if not slightly larger. Also take into consideration the thickness of the book, and what you plan on putting inside. One reason I chose to skip using the engineering book aside from liking it - a very clean book considering it was published in 1939 - is that it's only about 1.5" thick which can be limiting on what I can put inside if I plan on using both sides - and I do. I would caution about using too thick of a book. I saw an old dictionary that looked useful but the thickness - at least 3.5" - was a turn off. Remember this should fit in a bag.
Well that's it for now. Everything is set up and ready to go, so as soon as I hear back about a machine, we'll be off and running again.
Sunday, February 16, 2014
The next project
This will be the next project, and I've already started. I've been sick the last couple of days, so this seems like a perfect opportunity to attempt this. I was very picky about the books that I chose, and I got lucky and found a well loved college text book from 1947 in a bargain bin at a local thrift shop. I managed to get three for under $12 so if one fails, I have two back ups.
I might post pictures as I go. We'll see what happens.
I might post pictures as I go. We'll see what happens.
Monday, November 4, 2013
Renovation: After (part 2)
The final result.
Ok so there were issues left and right when it came to finishing this house. The two biggest headaches were the kitchen cabinets and then the wood paneling that was throughout the house.
The kitchen cabinets took gallons of stain. Gallons. No matter how much stain was applied, a couple of hours drying and it looked as though nothing had been done.
The wood paneling in the house was a bigger problem. This stuff was in the living room, dining room, and the first bedroom and had been applied directly to the wall boards so removing it without pulling down all the walls was impossible. Instead I opted to simply paint over the walls. I wasn't sure how I felt about this option, but pulling down 3/4 of the interior walls wasn't a viable option when it would delay everything else. I was fairly happy with the final results.
We did discuss replacing the kitchen tile with something more modern, but I was a fan of the retro look we achieved with the updated cabinets and appliances. The one appliance we didn't replace was the fridge. While it doesn't match the other appliances, it was new so replacing it seemed excessive.
Despite turning the house into a rental property, I opted to spend the money on good flooring and carpet rather than the cheaper "rental" level flooring. This gave us a floor that will last through several tenants without needing to be replaced. While the majority of the house is "rental" white, we did have a little fun with the interior. The carpet in the bedrooms and living room is a dark blue, and the built in laundry cabinet was painted a pale green to break up the long white hallway. We installed heavy use tile in the entry way since that would get the most use, and while stainless steel is all the rage, I went with brushed nickel to minimize the amount of cleaning required - stainless is a real pain to keep clean. We also chopped the hedges around the house to open it up a little more and ended up replacing the garage door. And with the new windows, the A/C is capable of bringing the inside temp of the house down into the low 60's.


Renovation: Before (part 2)
So in 2009, my sister and I renovated my father's house.
I am going to clear up one misconception.
Renovating a house is not fun or as much fun as you might hope it would be. Don't fall for the Lowe's or Home Depot commercials with the happy couple, happily demolishing their home. It doesn't go that way. I grew up around major construction sites thanks to my family's engineering firm so I knew about delays, hidden costs, etc. and this still threw plenty of punches.
Ok I'm not going to explain every single picture because that would be excruciatingly detailed even for me, but I'll give you a quick run down.
This house, as you can tell by the light fixture, was built in the early 1950's by my grandparents.
They lived there until their passing and then it was handed over to my father until his untimely passing.
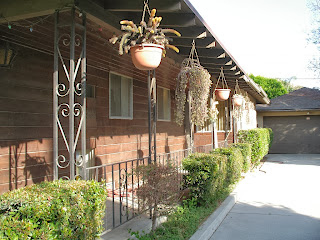
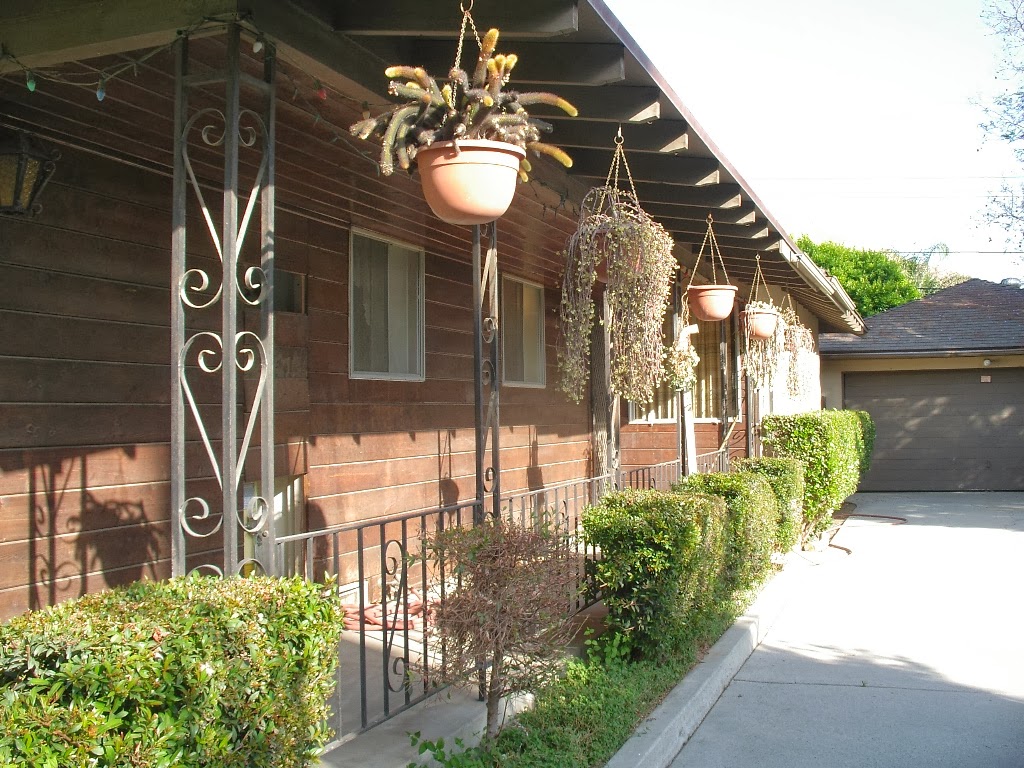
As you can see from some of the pictures, not much had changed in the house since it was first built. All the windows were single paned and leaked like a sieve. Despite the A/C going 24/7 - Southern California summer is a lousy time to renovate - it never dropped below 90 in the house.
We used to have massive get family dinners here so the cabinets were full of dishes.
My father loved two things in life aside from his family. Books and climbing. The picture with the through and through fireplace shows a sliver of what was in the front room. What you can't see are the massive bookshelves holding hundreds of books.
The outside of the house was mostly taken care of - lawn mowed and water, fruit trees in the back all healthy - but there was a lot of overgrowth that needed to go.
And the garage door wouldn't shut unless you slammed it.
Inside we had to replace just about everything you see from flooring to appliances, lighting, fans, etc. We also replaced the interior doors, something that sounded easy and ended up being a royal pain. What passed as "standard" in the 1950's is far from standard now so many items that sounded simple to replace, such as the doors, were in fact more difficult than needed.
Things to do:
* Clear down the house
* Deep clean house
* Replace all windows
* Bring electrical up to code
* New flooring
* Replace all fixtures
* New appliances
* Fix garage
* Re-plump house
* Clear down back yard
* Fix roof
* New gutters
* Paint house - interior and exterior
* New interior doors
* Mend fence
* Replace misc. items
* Repair interior walls
* Patch house against pests
* New roof insulation
A pretty standard list but each item had sub items. For example, new flooring meant removing the old flooring, replacing the padding, finding tile, laminate, and carpet, and installing. Replace misc. items means that every knob, pull, drawer handle, everything was replaced.
As you can see, this project is a lot bigger than it looks. This doesn't cover all the other tasks that had to be handled while the house was being worked out. That meant meetings with the lawyers, dealing with the estate, the other property, etc.
This was a large project.
I am going to clear up one misconception.
Renovating a house is not fun or as much fun as you might hope it would be. Don't fall for the Lowe's or Home Depot commercials with the happy couple, happily demolishing their home. It doesn't go that way. I grew up around major construction sites thanks to my family's engineering firm so I knew about delays, hidden costs, etc. and this still threw plenty of punches.
Ok I'm not going to explain every single picture because that would be excruciatingly detailed even for me, but I'll give you a quick run down.
This house, as you can tell by the light fixture, was built in the early 1950's by my grandparents.
They lived there until their passing and then it was handed over to my father until his untimely passing.
As you can see from some of the pictures, not much had changed in the house since it was first built. All the windows were single paned and leaked like a sieve. Despite the A/C going 24/7 - Southern California summer is a lousy time to renovate - it never dropped below 90 in the house.
We used to have massive get family dinners here so the cabinets were full of dishes.
My father loved two things in life aside from his family. Books and climbing. The picture with the through and through fireplace shows a sliver of what was in the front room. What you can't see are the massive bookshelves holding hundreds of books.
The outside of the house was mostly taken care of - lawn mowed and water, fruit trees in the back all healthy - but there was a lot of overgrowth that needed to go.
And the garage door wouldn't shut unless you slammed it.
Inside we had to replace just about everything you see from flooring to appliances, lighting, fans, etc. We also replaced the interior doors, something that sounded easy and ended up being a royal pain. What passed as "standard" in the 1950's is far from standard now so many items that sounded simple to replace, such as the doors, were in fact more difficult than needed.
Things to do:
* Clear down the house
* Deep clean house
* Replace all windows
* Bring electrical up to code
* New flooring
* Replace all fixtures
* New appliances
* Fix garage
* Re-plump house
* Clear down back yard
* Fix roof
* New gutters
* Paint house - interior and exterior
* New interior doors
* Mend fence
* Replace misc. items
* Repair interior walls
* Patch house against pests
* New roof insulation
A pretty standard list but each item had sub items. For example, new flooring meant removing the old flooring, replacing the padding, finding tile, laminate, and carpet, and installing. Replace misc. items means that every knob, pull, drawer handle, everything was replaced.
As you can see, this project is a lot bigger than it looks. This doesn't cover all the other tasks that had to be handled while the house was being worked out. That meant meetings with the lawyers, dealing with the estate, the other property, etc.
This was a large project.
Sunday, November 3, 2013
Renovation: Before (part 1)
I realize that I have neglected this blog, and so I plan to try and remedy that situation with this post.
This will be a large post that I have broken up into several posts. This post will be nothing but pictures. The next post will explain each of the pictures and give background.


This will be a large post that I have broken up into several posts. This post will be nothing but pictures. The next post will explain each of the pictures and give background.


Subscribe to:
Posts (Atom)