It's been well over two years since I last posted here, and part of that reason is that I haven't had many projects to do. Coaching takes up a large part of my time, and when I'm not coaching, I'm usually thinking about it, and then I'm coaching again either through video review, note review, data review, etc.
Basically it's a lie that I have a life outside of coaching. I have brief pit stops outside of coaching.
This is one of those pitstops.
What is a lightbox? This is a lightbox. I think these have something to do with photography, and drawing. I know that you can use them to make it easier to trace a picture, and that they can backlight objects, but being neither photographer, or solid artist, I have no idea.
But I do like the idea of having a lightbox.
So I sort of built one. I played with the idea of gathering up the materials needed to make one from scratch, but I began running into a few hiccups.
First, the weather. It's been cold and rainy, which means working inside of the shop that I don't have with the power tools I own, but have no space to set up.
Second, the glass. I could find it, but that would mean finding the glass before building the box.
Third, as with many of my projects - the headboard - once I start a project, the chances that it gets finished if it's very involved vary, but usually they don't. The headboard is done, but once I realized the amount of time required to sand, and stain the entire piece, I quickly lost interest. And when I discovered that IKEA does have doors, and that modifying an existing door or window shutters was more cost effective and easier than building a door or window shutter, the project was canned.
So knowing my love of starting things, and love of leaving them when I move onto something else, I decided to take advantage of a ridiculous sale at Michaels and buy one of their large shadow boxes. Finished, hinged, with a removeable back, it was perfect.
The link I posted used paper to create the ghosted effect, but I decided I didn't want to buy tracing paper, so instead I opted for a can of frosted glass spray paint.
The final piece was finding LED light strips on Amazon. These things are amazing. They have an adhesive back, and you can cut them at various points. Just be sure to buy the set with the power adapter. I neglected to do this, so a three day project took a week as I had to order the adapters. I opted for two just incase I decided to get creative again.
Step 1: I removed the lid with the glass from the box, and taped off the top edge. I didn't tape along the inner frame where it met the glass. That was time consuming, and I didn't care if there was overspray on that part.
Step 2: I cleaned the glass of fingerprints, before applying my first three coats. I made the mistake of taking advantage of a brief sunny moment outside to apply these coats, and when I went back inside, several small insects had decided to land on the fresh paint. I had to carefully remove those.
Step 3: I applied several more coats to the surface. I was ok with erring on the side of it being too thick because I was using LEDs which would send off plenty of light.
Step 4: I reattached the lid to the box, then removed the backboard to locate the LEDs.
Step 5: Honestly the LEDs gave me a few moments of pause. The original LED lights came with zero instructions, and a bunch of random adapters, and cords. Thankfully the power cord boxes provided instructions, and after a quick read through, I applied the LEDs in a single strip around the box, just inside where the backboard mounted. I considered leaving the backboard off, but opted to instead cut a small notch in the side to run the power cord.
Step 6: Plug in, and done.
What am I going to use this lightbox for? I haven't decided yet, but I do like it. The link I used suggested making a sign for it. I think that isn't a bad idea, but it's not one that I'm likely to follow.
If you have the tools, and the space, then I'd suggest making this from scratch. I prefer the spray paint idea better than the tracing paper, but that's my opinion. I do like the idea of using the shadowboxes from Michaels simply because it cuts down on a few steps, the hinge means you can store items in the box when it's not in use, and because I hate painting and the box is already painted. It's up to you. I bought the frame at a 70 percent off sale and saved a bundle.
Friday, September 23, 2016


Thursday, August 7, 2014
How long has it been?
 |
| As you can see, quite a blow out. |
This means new paint, new fixtures, new hanging cabinets, new floor, and of course, a new washing machine.
It's a rather straightforward sounding project, and we have a majority of the items on hand including the paint and the tile so with a week before the arrival of the new machine, we should be able to get the whole project completed.

The first things first, everything in the room comes out including the toilet, the shelving, old cabinets, and the shop sink.
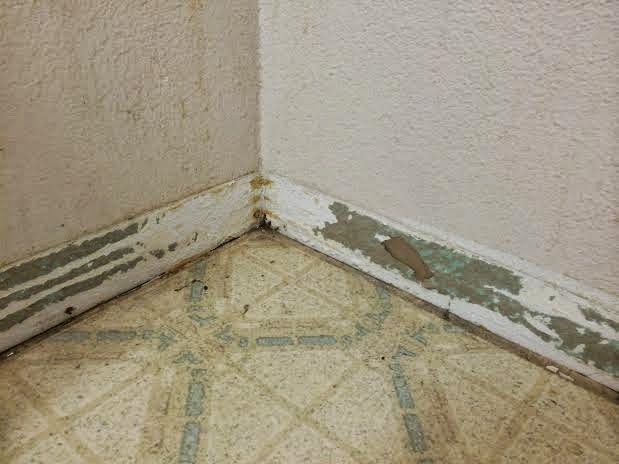

More prep work with the two machines being removed. The big white spot was where the previous owners decided to paint around the old toilet rather than remove it to do the job correctly. And the water hookup is quite low, so now is also a great time to move it to a more reasonable height.

A better shot of what I'm talking about above. That outlet on the left is pressed up against the toilet which means to run water to it, we had to run to the outlets on the right with a flexible hose. It works, but it's about as low rent as you can get. Some drywall and plumbing work and we can make that outlet useable.

This picture was from several days later, as we prepped the room for painting. What's transpired in between was the moving of the outlet (see above), and setting the insulation in the wall on fire. The builders installed it backward, and while we were cutting the pipes in the walls, a spark set the paper on fire. It was quite exciting putting it out, and that is why you should always have a fire extinguisher handy at all times. But that excitement aside, the plumbing went quickly and we even managed to remove a massive clog. I have my suspicions that the previous owners were heavily involved in some nefarious schemes including "cooking" based on what the clog was made of. I believe you get my drift there.

Well it wouldn't be a Stark project without some sort of hiccup, and this project has had plenty. We had to replace two tools - a dual action sander, and tile saw - and then just as we were prepping the floor for tiling, we noticed that it was peeling. No big deal, we can just pull it back and cut it and is that black mold?
The previous owners hadn't installed the old toilet correctly, nor did they know how to install a floor. So the toilet leaked terribly, and to counteract this, they used gallon upon gallon of glue to try and create a barrier with the old flooring. As you can see, this doesn't work. But it does make tearing up the old floor incredibly difficult.
This is where things stand now. Luckily the black mold looks worse than it actually is, and we've done a great job cleaning it up. It's nearly gone so we'll be able to install the new floor this weekend. The room is also completely painted so all we're waiting on is the flooring and we can start putting the place back together. And not a moment too soon since we've had to have the house opened up for ventilation, a wonderful thing when it's been 90+ outside. I'm done with trying to go to sleep in a house that's hovering around 85.
Sunday, February 23, 2014
Still working
This project is not as easy as it would appear, though I will admit that when it comes to anything sewing related, I'm not even a novice.
Problem 1: Weaving the elastic. It's a pain. A serious pain. Even when you've pinned down the edges and had them sewn it's not easy.
Problem 2: Sewing the elastic. It goes all over and even the person who helped me get the edges down had some trouble. I solved this by using double stick tape cut in half. I put down the tape, then applied the pieces so they stayed in relative order. There's still a couple trouble spots, but I'm not nit picking.
Problem 3: Stretching the elastic tight. I resolved to use a clip board to do this. What's the problem? Well the backing that you're attaching the elastic to isn't exactly firm so when you pull it has a tendency to want to come with the pull. I solved this by using a clip board and clipping down the edge I'm pulling against, then pinning the opposite edge, then sewing it up - by hand because the board gets in the way of the machine. The results were pretty good.
Problem 4: This was my problem, but one that you should avoid. Use black as your backing. I went with gray and the foam I used is showing stress mark where the foam got mangled or scratched. Issue? Only cosmetically. If you care about that, use black.
This project I figured you could knock out in two days, a day if you're really good with the machine and you don't have interruptions. I tend to take longer on projects because I break them up, or walk away when I run into an issue rather than sit there and get frustrated. So I'm still working, but I can see this coming together.
Will I do this project again? Hard to say. I think it's going to look nice, and I can tell you that the money spent is less than it would cost me to get a similar professionally made item. I might do it again, but I think that there needs to be some modifications done. The weaving isn't as fun as it sounds, and being the first, there's a lot of trial and error. We'll see.
Problem 1: Weaving the elastic. It's a pain. A serious pain. Even when you've pinned down the edges and had them sewn it's not easy.
Problem 2: Sewing the elastic. It goes all over and even the person who helped me get the edges down had some trouble. I solved this by using double stick tape cut in half. I put down the tape, then applied the pieces so they stayed in relative order. There's still a couple trouble spots, but I'm not nit picking.
Problem 3: Stretching the elastic tight. I resolved to use a clip board to do this. What's the problem? Well the backing that you're attaching the elastic to isn't exactly firm so when you pull it has a tendency to want to come with the pull. I solved this by using a clip board and clipping down the edge I'm pulling against, then pinning the opposite edge, then sewing it up - by hand because the board gets in the way of the machine. The results were pretty good.
Problem 4: This was my problem, but one that you should avoid. Use black as your backing. I went with gray and the foam I used is showing stress mark where the foam got mangled or scratched. Issue? Only cosmetically. If you care about that, use black.
This project I figured you could knock out in two days, a day if you're really good with the machine and you don't have interruptions. I tend to take longer on projects because I break them up, or walk away when I run into an issue rather than sit there and get frustrated. So I'm still working, but I can see this coming together.
Will I do this project again? Hard to say. I think it's going to look nice, and I can tell you that the money spent is less than it would cost me to get a similar professionally made item. I might do it again, but I think that there needs to be some modifications done. The weaving isn't as fun as it sounds, and being the first, there's a lot of trial and error. We'll see.
Tuesday, February 18, 2014
The next project follow up
I've been dealt a temporary setback. First off, I don't know how to use a sewing machine. Secondly, the sewing machine I was going to use under careful supervision gave up the ghost as I was in the process of doing a test run. Currently I'm waiting to hear back from a friend about the availability of her mother's machine and possible help.
But aside from that, let me catch you up. If you haven't taken a look at the project page, here's the link again. Rather clever if you ask me.
Securing the needed materials - until this sewing machine issue - was the biggest problem. I went through four different thrift stores looking for a book that suited my needs. I decided to stick with the older books for two reasons. The first is that I like the covers better than what we have on the newer hardbound books. Secondly, I surmised that older books would be well used books and the spines would be separated from the binding. This proved correct.
If successful, I plan on making a second one of these so when I found some rather academic looking books that suited my needs, I grabbed all of them. For the price of $11 dollars and some odd looks from the cashier, I am now set to do at least two. I'm rather attached to the old engineering guide that I picked up.
Forget fabric stores. I went, I looked, I went to Michaels and that's where I recommend you go for your materials.
I opted for heavy paper - think 4x the thickness of poster board and much stiffer. For a second version, I think I'll spend the money - $13 rather than $7 - and get heavy matting. The book I chose is still in good condition, but I think I'd like the extra sturdy feel of picture matting.
You will need the 9 yards of elastic. I went with the 0.5 inch strands and have used all but some scrapes. I also went with the neoprene backing because that was readily available. I chose grey because I liked the look better than black on black. They had some extra fun colors - orange and red - which I might use for the second book. You can see the neoprene behind the elastic when done so that might be fun.

As you can see here, I've marked out the areas with what I'm going to put where. The original has a large pocket on the right. I'm debating doing this, or weaving in some elastic for pens or other things. I'm going to put the iPod at the top - she put her cell phone there - and then straight elastic on the left.
The book I chose was slightly smaller than the one she used so I don't think I'll be able to get my laptop charger inside. I don't think I'd want to in any case because of how much space that would take up. Instead I'm opting to corral the cords I have in my bag - iPod charger, phone charger plus extention, HDMI cable - and a flash drive and ear buds.

This is where I am right now. I've cut the lengths I need and then attached the long pieces with pins. And then the sewing machine mishap happened, so now we're in a holding pattern. But things are coming along nicely, and it's a project you can probably knock out in a day, maybe two.
I don't have any recommendations as of now. I would say that you should error on the side of a book at least as large as the original if not slightly larger. Also take into consideration the thickness of the book, and what you plan on putting inside. One reason I chose to skip using the engineering book aside from liking it - a very clean book considering it was published in 1939 - is that it's only about 1.5" thick which can be limiting on what I can put inside if I plan on using both sides - and I do. I would caution about using too thick of a book. I saw an old dictionary that looked useful but the thickness - at least 3.5" - was a turn off. Remember this should fit in a bag.
Well that's it for now. Everything is set up and ready to go, so as soon as I hear back about a machine, we'll be off and running again.
But aside from that, let me catch you up. If you haven't taken a look at the project page, here's the link again. Rather clever if you ask me.
Securing the needed materials - until this sewing machine issue - was the biggest problem. I went through four different thrift stores looking for a book that suited my needs. I decided to stick with the older books for two reasons. The first is that I like the covers better than what we have on the newer hardbound books. Secondly, I surmised that older books would be well used books and the spines would be separated from the binding. This proved correct.
If successful, I plan on making a second one of these so when I found some rather academic looking books that suited my needs, I grabbed all of them. For the price of $11 dollars and some odd looks from the cashier, I am now set to do at least two. I'm rather attached to the old engineering guide that I picked up.
Forget fabric stores. I went, I looked, I went to Michaels and that's where I recommend you go for your materials.
I opted for heavy paper - think 4x the thickness of poster board and much stiffer. For a second version, I think I'll spend the money - $13 rather than $7 - and get heavy matting. The book I chose is still in good condition, but I think I'd like the extra sturdy feel of picture matting.
You will need the 9 yards of elastic. I went with the 0.5 inch strands and have used all but some scrapes. I also went with the neoprene backing because that was readily available. I chose grey because I liked the look better than black on black. They had some extra fun colors - orange and red - which I might use for the second book. You can see the neoprene behind the elastic when done so that might be fun.
As you can see here, I've marked out the areas with what I'm going to put where. The original has a large pocket on the right. I'm debating doing this, or weaving in some elastic for pens or other things. I'm going to put the iPod at the top - she put her cell phone there - and then straight elastic on the left.
The book I chose was slightly smaller than the one she used so I don't think I'll be able to get my laptop charger inside. I don't think I'd want to in any case because of how much space that would take up. Instead I'm opting to corral the cords I have in my bag - iPod charger, phone charger plus extention, HDMI cable - and a flash drive and ear buds.
This is where I am right now. I've cut the lengths I need and then attached the long pieces with pins. And then the sewing machine mishap happened, so now we're in a holding pattern. But things are coming along nicely, and it's a project you can probably knock out in a day, maybe two.
I don't have any recommendations as of now. I would say that you should error on the side of a book at least as large as the original if not slightly larger. Also take into consideration the thickness of the book, and what you plan on putting inside. One reason I chose to skip using the engineering book aside from liking it - a very clean book considering it was published in 1939 - is that it's only about 1.5" thick which can be limiting on what I can put inside if I plan on using both sides - and I do. I would caution about using too thick of a book. I saw an old dictionary that looked useful but the thickness - at least 3.5" - was a turn off. Remember this should fit in a bag.
Well that's it for now. Everything is set up and ready to go, so as soon as I hear back about a machine, we'll be off and running again.
Sunday, February 16, 2014
The next project
This will be the next project, and I've already started. I've been sick the last couple of days, so this seems like a perfect opportunity to attempt this. I was very picky about the books that I chose, and I got lucky and found a well loved college text book from 1947 in a bargain bin at a local thrift shop. I managed to get three for under $12 so if one fails, I have two back ups.
I might post pictures as I go. We'll see what happens.
I might post pictures as I go. We'll see what happens.
Monday, November 4, 2013
Renovation: After (part 2)
The final result.
Ok so there were issues left and right when it came to finishing this house. The two biggest headaches were the kitchen cabinets and then the wood paneling that was throughout the house.
The kitchen cabinets took gallons of stain. Gallons. No matter how much stain was applied, a couple of hours drying and it looked as though nothing had been done.
The wood paneling in the house was a bigger problem. This stuff was in the living room, dining room, and the first bedroom and had been applied directly to the wall boards so removing it without pulling down all the walls was impossible. Instead I opted to simply paint over the walls. I wasn't sure how I felt about this option, but pulling down 3/4 of the interior walls wasn't a viable option when it would delay everything else. I was fairly happy with the final results.
We did discuss replacing the kitchen tile with something more modern, but I was a fan of the retro look we achieved with the updated cabinets and appliances. The one appliance we didn't replace was the fridge. While it doesn't match the other appliances, it was new so replacing it seemed excessive.
Despite turning the house into a rental property, I opted to spend the money on good flooring and carpet rather than the cheaper "rental" level flooring. This gave us a floor that will last through several tenants without needing to be replaced. While the majority of the house is "rental" white, we did have a little fun with the interior. The carpet in the bedrooms and living room is a dark blue, and the built in laundry cabinet was painted a pale green to break up the long white hallway. We installed heavy use tile in the entry way since that would get the most use, and while stainless steel is all the rage, I went with brushed nickel to minimize the amount of cleaning required - stainless is a real pain to keep clean. We also chopped the hedges around the house to open it up a little more and ended up replacing the garage door. And with the new windows, the A/C is capable of bringing the inside temp of the house down into the low 60's.
Ok so there were issues left and right when it came to finishing this house. The two biggest headaches were the kitchen cabinets and then the wood paneling that was throughout the house.
The kitchen cabinets took gallons of stain. Gallons. No matter how much stain was applied, a couple of hours drying and it looked as though nothing had been done.
The wood paneling in the house was a bigger problem. This stuff was in the living room, dining room, and the first bedroom and had been applied directly to the wall boards so removing it without pulling down all the walls was impossible. Instead I opted to simply paint over the walls. I wasn't sure how I felt about this option, but pulling down 3/4 of the interior walls wasn't a viable option when it would delay everything else. I was fairly happy with the final results.
We did discuss replacing the kitchen tile with something more modern, but I was a fan of the retro look we achieved with the updated cabinets and appliances. The one appliance we didn't replace was the fridge. While it doesn't match the other appliances, it was new so replacing it seemed excessive.
Despite turning the house into a rental property, I opted to spend the money on good flooring and carpet rather than the cheaper "rental" level flooring. This gave us a floor that will last through several tenants without needing to be replaced. While the majority of the house is "rental" white, we did have a little fun with the interior. The carpet in the bedrooms and living room is a dark blue, and the built in laundry cabinet was painted a pale green to break up the long white hallway. We installed heavy use tile in the entry way since that would get the most use, and while stainless steel is all the rage, I went with brushed nickel to minimize the amount of cleaning required - stainless is a real pain to keep clean. We also chopped the hedges around the house to open it up a little more and ended up replacing the garage door. And with the new windows, the A/C is capable of bringing the inside temp of the house down into the low 60's.
Subscribe to:
Posts (Atom)