So noticing that my head board project is on hold till it gets warm enough to work on it again - I don't have the shop space to finish sanding and staining - I've decided to take a look at this chest that I've owned since I was a little tyke. It's not really serving any purpose other than a landing spot for a lot of tools but it used to house all my clothing, complete with pictures of what was supposed to go in each drawer. It was my mom's idea and it didn't really work that well since I wasn't exactly a laundry person and stuffed everything I could into a single drawer. That's all since changed.
What inspired me was wandering through Anthropologie with a friend yesterday looking for random Christmas gifts when I stumbled upon a rack full of knobs and handles for chests and drawers. And while the prices were a bit extreme - $8 bucks for a tiny handle! - I was thinking back to this chest and it's rather plain looking standard wooden knobs. Interesting...an idea forms. So today I decided that I would tear through this chest and empty it out of all sort of random odds and ends - it kind of became a hobby chest full of my old trains - and see if it were possible to replace the handles with something more stylish.
Wednesday, December 22, 2010
Thursday, November 4, 2010
The Bed Frame pt. 7
It's been a very long time since I've updated this blog but that's most because I've had nothing to update it with. The bed frame has taken a back seat to coaching - as do most projects - and the weather around here certainly hasn't helped much. It's been nice the last couple of days but that's due to change soon so it's a matter of finding a way to finish up as much as I can before things get really bad outside.
The task list:
1. Sand down and apply a second coat of stain to the posts
2. Sand and stain the head board.
3. Sand and apply a second coat of stain to the head board.
Really what's slowed things down is the head board. I'm really not looking forward to trying to stain that piece with the grains of the wood running several different directions and it looking like I might need to add a couple extra pieces so I can avoid having any dark spots on the cut wood.
I've also decided to use a different brush to apply the stain and have moved over to foam brushes hoping that this will help make things a little more even. I've also considered using a rag but this stain seems to resist pretty much every solvent made to clean it up.
Hopefully next week with us moving over to winter practice where I get a little more time and things are less stressful I'll be able to knock out at least the posts and then look at designing the remaining bed parts.
Monday, September 27, 2010
The Bed Frame pt. 6
Progress. This last weekend turned out nice enough that I was able to get the posts for the head board cleaned up and managed to get the first coat of stain on.
 Sanding down the remaining swirls and odd marks on both posts
 Success. The first coat of stain went on rather easily and while there are a few touch up spots I'm fairly pleased the the overall results.
 In the process of applying the stain I did manage to stain part of my foot. The shoes were old but I really liked them plus the stain turned my foot a nice shade of mahogany. The important thing though is that the posts are almost done. The head board should be completed soon and then we can move to the frame.
 Sanding down the remaining swirls and odd marks on both posts
 Success. The first coat of stain went on rather easily and while there are a few touch up spots I'm fairly pleased the the overall results.
  In the process of applying the stain I did manage to stain part of my foot. The shoes were old but I really liked them plus the stain turned my foot a nice shade of mahogany. The important thing though is that the posts are almost done. The head board should be completed soon and then we can move to the frame.
Tuesday, September 21, 2010
The Bed Frame pt. 5
No news on the bed frame project other than I haven't had time to work on it. Between starting fall season and the weather changing toward northwest fall - love this time of the year - I haven't had the time or energy needed to finish off the project. I'm hoping that this weekend will allow me to get more of it done.
A quick recap for those who don't want to go back through the previous four posts.
1. I couldn't find a bed frame that I liked so inspired by my friends Sonja and Chris I decided to build my own.
2. After sorting through antique malls for a door to use as the head board, I decided on old window shutters. Since the window shutters cost so much money and required a ton of prep work I decided to build my own.
3. Designed and built my own window shutters then with my stepfather's help we designed and built the frame.
4. Everything was framed up and nailed into place so we started on building the posts that will hold it in place.
5. The posts were build, cut down leaving sanding and staining.
And that's where we stand right now. The bed posts need a little more sanding to remove the last swirl marks and then the head board needs to be lightly sanded. Then comes staining and it's looking like two coats will probably be needed. Finally will be the remaining frame which is still in the design phase. The important thing is to make sure that it's sturdy yet easy to disassemble for ease of moving. It's always nice having an engineer in the family.
Anyhow that's where things are right now. Zero forward progress but we're almost there.
Monday, September 6, 2010
The Bed Frame pt. 4
When we last left our hero he'd just completed assembly of the head board and was now moving into darker - literally - dangerous waters. Sanding and staining. Proper sanding and staining are critical and can be time consuming. This is not where you want to start cutting corners. It'd be a damn shame to have put this much time and money - albeit little money - into your bed just to ruin it because you get impatient. Take the time and you will be rewarded. The stain otherwise known as "Bombay Mahogany." Fancy name for dark red I suppose. This is the test piece sanded and prepped. Not a bad color but a second coat will definitely help.
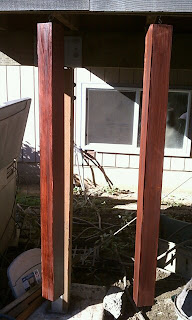
 This is one of the two posts that will support the head board. They're made from four boards glued together then cut down.
 Sanding is definitely not one of my favorite things in the world. Thankfully I found this little gadget that I bought for the renovation project I did at my dad's place in California. The good news is that it cuts sanding time by half. The bad news is that it creates a ton of sawdust that gets everywhere
. Like I said, everywhere. The result of sanding one half - yes half - of a bed post. The pile was a lot bigger once I was done with a single post but cameras and sawdust don't mix. I managed to get both posts nearly done although there are some swirl spots from the bench saw that will have to be worked on. Next up, the head board.
 The stain otherwise known as "Bombay Mahogany." Fancy name for dark red I suppose. This is the test piece sanded and prepped. Not a bad color but a second coat will definitely help.
 This is one of the two posts that will support the head board. They're made from four boards glued together then cut down.
 Sanding is definitely not one of my favorite things in the world. Thankfully I found this little gadget that I bought for the renovation project I did at my dad's place in California. The good news is that it cuts sanding time by half. The bad news is that it creates a ton of sawdust that gets everywhere
.
 Like I said, everywhere. The result of sanding one half - yes half - of a bed post. The pile was a lot bigger once I was done with a single post but cameras and sawdust don't mix. I managed to get both posts nearly done although there are some swirl spots from the bench saw that will have to be worked on. Next up, the head board.
 Saturday, September 4, 2010
The Bed Frame pt. 3
It's Labor Day weekend and I've definitely lived up to the name. Taking advantage of one of my few remaining free weekends - fall season starts Tuesday - I got the rest of the bed frame sketched out and put together the head board.
 The cap and bottom piece for the head board on the left and center of the picture. I wasn't sure what to do about the posts so my step-dad suggested that we build our own so they match the rest of the frame. That's the pile on the right.
 Life is so much easier when you've got the right tools.
 The nearly finished product. The posts will go on either side of the outer shutters. All that's left is to fill in any flaws, sanding then stain. Next up is the frame.
 The cap and bottom piece for the head board on the left and center of the picture. I wasn't sure what to do about the posts so my step-dad suggested that we build our own so they match the rest of the frame. That's the pile on the right.
  Life is so much easier when you've got the right tools.
 The nearly finished product. The posts will go on either side of the outer shutters. All that's left is to fill in any flaws, sanding then stain. Next up is the frame.
Monday, August 30, 2010
The Bed Frame pt. 2
Fall season is right around the corner which means recruitment and fund raising take priority over not having a bed. Fortunately today is a rather easy day so I managed to get a little further ahead. Right now I'm working out the kinks in how to build up the frame for my head board but for now I got the interior pieces done.
 All the pieces have been cut and numbered, important since I'm building four different "window shutters" and I want them to each look a little different. Think rustic. Numbering and recording now means that when it comes time to put them together I won't be trying to figure out what goes where. Remember kids, Anthony Bourdain says "Prior preparation prevents piss poor performance."
 Beginning to set up the head board. The space I'm working on is only about about 4 feet wide but each piece will be separated by about 3 inches.
 A closer look at this "window shutter" design that I keep talking about.
 All four pieces done, marked and ready for the rest of the frame. To cut down on the wood I'd need I've decided to go with a "floating" look meaning instead of nailing these boards to two pieces running perpendicular across the back side, as a real window shutter might have, the frame instead will hold them in place.
 All the pieces have been cut and numbered, important since I'm building four different "window shutters" and I want them to each look a little different. Think rustic. Numbering and recording now means that when it comes time to put them together I won't be trying to figure out what goes where. Remember kids, Anthony Bourdain says "Prior preparation prevents piss poor performance."
 Beginning to set up the head board. The space I'm working on is only about about 4 feet wide but each piece will be separated by about 3 inches.
 A closer look at this "window shutter" design that I keep talking about.
  All four pieces done, marked and ready for the rest of the frame. To cut down on the wood I'd need I've decided to go with a "floating" look meaning instead of nailing these boards to two pieces running perpendicular across the back side, as a real window shutter might have, the frame instead will hold them in place.
Friday, August 27, 2010
The Bed Frame pt. 1
 I have a particular way that I want things to look especially if I'm going to spend money on them. Having sold my old bed - a single - a couple years ago to the nice family across the street and after several disappointing trips to furniture stores in an attempt to find a bed frame that I liked, I was pretty much ready to give up on getting exactly what I wanted and settle for whatever I could find at IKEA.
Long story short while reading up on Chris and Sonja's slow renovation of their house in Seattle, I stumbled upon a short entry about turning a door into a head board and decided that since I couldn't find a bed frame I liked, I'd build one. Ambitious yes. My friend Christie informed me that I need to make sure it was sturdy - good point - but I'd helped my step-dad build the deck at the house and it was still standing some 8 years later.
The first job was measuring my friend's queen sized bed frame to get a rough idea of what I should be looking for and then it was off to the antique stores to find something suitable. I hit this place first and while they had a massive selection of doors and pieces I could use the door alone would cost almost as much as a full frame from Sweden. However while wandering through the upstairs loft, I came across this.
 Old window shutters. At $25 a piece they were a bargain compared to the door. However, the four I chose were coated with thick layers of white paint with blue starting to show below that. Having spent last summer remodeling my dad's old house and recalling how "fun" it was to strip old paint, sand, polish and then stain, I snapped a few pictures and headed to Home Depot.
 And came up with this. Hemlock, cut to order, free of paint, hidden knots and ready to be finished. I ended up with more than I needed for less than $50 dollars. For some added character I made a strictly aesthetic choice and bought pieces of varying width to match the rustic look of the shutters found in Aurora.
  The next task was measuring out the pieces and marking them for the saw. The head board - the first picture - will be made of four "window shutters" spaced about 3 inches apart for a grand total length of 64 inches and stand about 28 inches tall. Tomorrow I should be able to get the pieces cut down to size and then start assembling them.
Sunday, August 15, 2010
The Truck
 The old S-10, my first car that wasn't handed down to me. Despite the shortcomings - zero towing capacity, no passenger room, 2wd - she was a great little truck getting me through two years of college, a year in San Francisco with frequent short trips back to Portland and Eugene, two years in Oregon, a year in Washington - Seattle to Tacoma 7 days a week - and another year in Oregon before finally being force retired last summer.
Last summer on a trip back from Portland, she died. This was the third time the truck died on me though the first that did not leave me stranded during a freak heat wave or after a double shift at work. This time she thoughtfully died in the parking lot of a 7-11 leaving my friend and I plenty of opportunities to fill up on slurpees, sour ropes and bubble gum while waiting for the tow company.
After a quick "wanna do me a favor" phone call to the local Chevy dealer - you've got to love having connections - it was determined that the fuel pump failed. Again.
 This is the source of all the trouble. Last time it failed I replaced it the "traditional" way meaning I unbolted the gas tank and dropped it out of the frame. 5 hours getting the tank out and back in; 20 minutes replacing the pump. This time I opted for removing the bed of the truck to gain access. 30 minutes and 8 bolts later, I'm staring the bugger in the face. Let's get started.
 Instead of spending $500 dollars to replace the broken pump with a similar pump that would probably quit inside of another year - though conveniently after the warranty expires - my step-dad and I decided to mount an aftermarket pump to the frame and run the wiring through the old pump and bypass the broken part.
 Finished product. We decided to re-route the hoses back along the frame to avoid getting near the exhaust system and then just for kicks installed a second fuel filter for a 1991 Mustang GT. We also recycled the broken fuel pump by pulling the fuel hose and running it down the outside of the canister. All in all a highly successful repair done for only $112 dollars vs. the $500 the dealer wanted.
 And just for kicks since the bed was off I decided to replace the rear shocks. Pretty.
Tuesday, August 10, 2010
Welcome
The point of this blog is to cover pretty much anything and everything that has nothing to do with coaching. Mostly it will be about random projects and similar but there will also be a smattering - yes smattering - of insight and other such goodies.
Projects range from things around the place such as working on cars or building/repairing to cooking and anything else in between. As it's stated on my profile, coaches or some coaches have lives outside of the sports world and seeing that I'm one such coach lucky enough to have such, it's time to take advantage of that.
So again welcome and enjoy.
Subscribe to:
Posts (Atom)